What is the meaning of Sarvangasana?
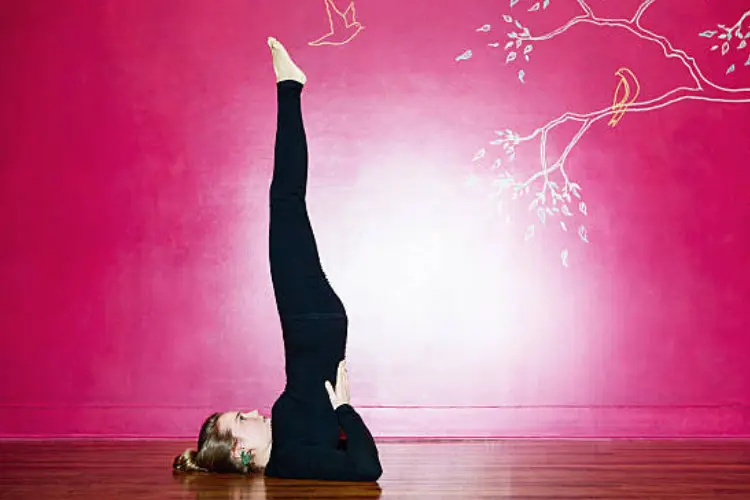
“Sarvangasana” comes from three Sanskrit words. “Sarva” means for all, “Anga” means body parts, and “Asana” means a position. The pose is called the shoulder stand. It is also called the “leg raise.” In this asana, we use our whole body. We must lie on our backs and bend our legs at 90 degrees. Then, we must use our hands to lift our elbows from the ground. Slowly rise, and then the entire body weight comes on our shoulders, and then we balance it on our shoulders.
Before we start Sarvangasana, we should practice Halasana. In Halasana, we lift our backs and legs, turn them almost 180 degrees, and lift them above our heads. Plough stretches our leg and ankle muscles, giving them the flexibility to do Sarvangasana.
What are the steps of Sarvangasana?
We should start with Ardha Sarvangasana.
Steps to Ardha Sarvangasana.
First, exhale slowly. Move the legs near the hips. Then, bend both legs at the thighs.
We lift the abdominal muscles with our fingers and thumbs in this position. Our body’s weight is on the elbows and legs, but in Sarvangasana, the weight is on the shoulders.
As long as you can hold this asana with the help of your hands, you will have to practice it for at least 1 to 2 minutes.
Return to your starting position:
Steps to Sarvangasana:
- Lie down on your back.
- After this, take a deep breath and slowly lift both legs upwards together.
- After this, raise the legs and back in a straight line.
- Support the back from both sides with both hands. Keep your elbows on the ground. Let the shoulders and neck touch the ground properly. Remember that your body should not move here and there, and your legs should remain straight.
- In this position, you have to breathe naturally. Look towards your feet and keep your toes steady.
Some other key points: -
- Try to Balance body weight on shoulders.
- You will Support your back with your hands.
- Bring your elbows closer and slide your hands along the back.
- The weight rests on the shoulders and upper arms, not the head or neck.
- Strengthen neck muscles slightly.
- Breathe deeply and hold the pose for 30-60 seconds.
Exiting the pose:
- you will slowly lower your knees toward your forehead.
- You will place your hands on the floor, and your palms should be faced down.
- You will slowly lower your spine, one vertebra at a time. You will lower it until your entire back hits the floor.
- keep your feet down on the ground.
- You should rest for at least 60 seconds.
How can I start this pose if I'm a beginner?
1. Wall Support:
- You spread your mat near a wall.
- Lie on your back and spread your legs.
- Now, raise your legs so that they rest on the wall.
- Lift your legs and hips off the floor against the wall.
- This exercise relieves the tension on your neck and shoulders.
2. Half Shoulder Stand:
- Lie down on your back.
- Bend your knees and bring them toward your chest.
- Raise your hips off the floor and use your hands to support your lower back.
- Now place both your feet on the floor and raise them upwards, making a slight arch.
3. Use Blanket:
- Now, we have to put a shaved blanket under our shoulders.
- It helps lift your upper body, reducing tension in the neck and shoulders.
- You should always ensure that your neck remains straight and there is not too much pressure on it.
4. Practice with a well-qualified Instructor:
• While practicing, ensure that the place where you are practicing is entirely safe.
Benefits of Sarvangasana
- Sarvangasana increases blood flow to every part of the body. It also helps revive body cells and cures chronic skin diseases.
- Sarvangasana strengthens our muscles. It’s easy and also reinforces our neck, shoulder, and arm. It increases hip flexibility and strengthens all our muscles.
- Sarvangasana increases the strength and flexibility of your spine. It also strengthens your back and shoulder arms.
- It strengthens the lower parts of your lungs and makes them more efficient. It improves your lung capacity.
- Regularly practicing Sarvangasana helps a lot. It controls our body weight, strengthens our abs, and reduces extra belly fat.
What are the common mistakes to avoid in Sarvangasana?
1. Slowly- slowly raise legs
2. Lifting the Head Off the Floor
3. Neck Strain:
4. Knee Alignment:
How can I improve my balance during this pose?
- To stabilize our body, we need to tense our core muscles. They should pull towards our spine and stay tense through the practice. It provides a stronger core and better balance.
- We must point our toes towards the sky, which helps us balance. We should also bend our legs to use our muscles.
- We should press our shoulders on the ground. It lets us spread our weight evenly on both shoulders.
- When we do Sarvangasana, we should focus on a point near our feet. To avoid moving too much, We should focus on a stable point. And this steady vision helps us maintain balance.
- We should breathe deeply and rhythmically. Continuous breathing calms our minds. A calm mind helps us stabilize the body.
Precautions:
- If you have a neck, shoulder, or wrist problem, do not do Sarvangasana. It can make your situation worse.
- Pregnant women and menstruating women should not do this asana.
- You should not do Sarvangasana if you have high blood pressure. Also, do not do it if you have chronic problems like cervical, thyroid, and heart disease. Instead, you can do Ardha Sarvangasana.
- If you have a back problem and you are healthy. If you have any health problems, ask your doctor before doing Sarvangasana. While you get immense benefits in Sarvangasana, there can also be disadvantages.


